Encapsulation: Protecting what’s really important
Encapsulation is an excellent method one can use when framing a piece of artwork that is fragile, valuable, or unsuitable for traditional top mounting. It usually involves many layers, mat windows, and rigid backings as well as some type of transparent film to cover the artwork being protected. There is a lot of designing and preparation involved in an encapsulation, if the artwork is to be properly protected and viewed. Objects and artworks that tend to be encapsulated are: magazines, baseball cards, paper cuts, very old paper, dried flowers, coins, and of course valuable fine art. The film which holds the artwork is usually a strong, durable, acid-free clear film known as Mylar. Other films, acrylics, and sheer fabrics also can be used, but Mylar is the best film for most encapsulations because of it durability and transparence. Some encapsulations can be two-sided; to get a better view of the artwork both front and back and to make sure it’s properly sealed. This is sometimes done out of necessity but usually is a desired aesthetic effect. The whole process of encapsulation can take some time and involves quite a bit of labor and high-quality materials. If done properly, the artwork being sealed will stay protected for decades to come and the integrity of the artwork will remain true with little to no deterioration.
Planning and Designing
Encapsulation can take some time in planning, in order to properly place the layers in the correct order, and to properly handle the artwork if a careful manner. If the fitting of the encapsulation is rushed or done haphazardly the artwork can be damaged or large amounts of lint or dirt can cling to the film. If the mat windows aren’t precisely followed and planned then the whole process can fall apart, and you’ll have to start all over again. Encapsulation is one of the best methods for preserving artwork, mainly because no adhesives or mounting is applied to the artwork in any way. This is especially important if you have something historical, one of a kind, or you if plan to resale the artwork in the future and want to preserve its pristine condition.
Using the Right Materials
Choosing the right molding, glazing, and mat is just as important as the appropriate film that you choose to encapsulate the artwork. The frame should have the proper depth to hold all of the components and to reflect the style and look of the overall design. The glazing should be as clear and UV protected as possible to give an unfettered view of the artwork and to protect it from UV radiation. The mat should be pH balanced and acid-free to reduce the possibility of deterioration and damage, and it should also look good!
What to encapsulate?
You can encapsulate just about anything depending on the needs and the dimensions of the object. Most 2D objects such as old prints, parchment (vellum), baseball cards, and stamps can be encapsulated in a clear, strong film such as Mylar or acrylic glazing. Encapsulating bulkier items is a bit trickier but can be done, depending on the size and the weight of the object. If the object isn’t too heavy and bulky then it can be easily mounted and encapsulated using a mesh or sheer fabric. Bulky objects that can be easily encapsulated are: baseballs, golf balls, dried flowers, coins, medals, and buttons. The main reason to encapsulate an object is to protect it from harming elements such as: light, air, dust, adhesives, over handling, and pests. Exposure to these elements can easily damage the object which can affect its monetary or sentimental value or even damage the object beyond repair. Hermetically sealing an object is also a possibility but usually not necessary unless there is a specific need for a tight vacuum seal.
Methods and Techniques
When using the materials to encapsulate an object, one must use great caution in handling those materials to prevent any potential scratches or smudges in the film and to prevent any comprising elements entering the framing package. Ideally, all materials should be acid-free and pH balanced, which will ensure longevity and integrity for decades to come. Any part of the framing with potentially harming elements, such as lignin, which can be found in all wood molding, can be properly sealed off if necessary. All measurements, cuts, and mounting adhesives should be very precise and double-checked. One should use gloves in handling all materials, especially when handling the artwork or object being sealed. If moisture, dirt, grease, or any other harming element enters the encapsulation it will stay with the artwork potentially for years to come, which can result in condensation and/or deterioration. Using methodical, planned, and patient tactics are the best methods to properly execute the encapsulation of an object or piece of artwork. If the framer is distracted and using improper and hurried techniques there is a good chance the object or artwork will be compromised and not properly sealed.
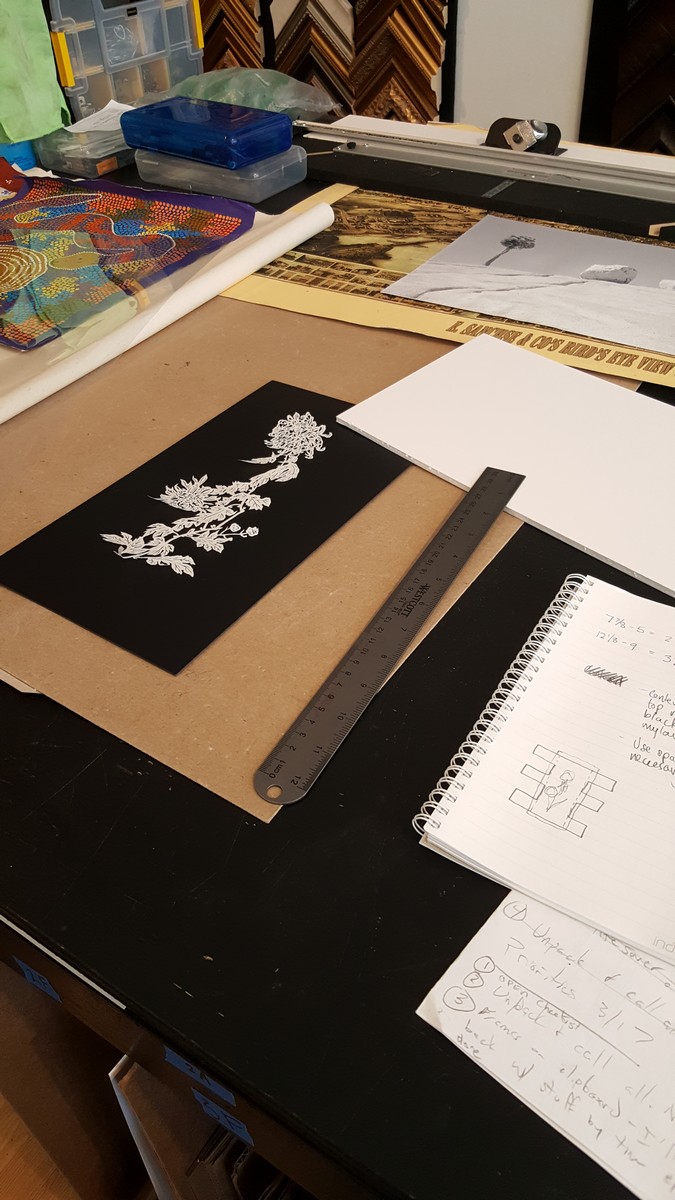
A Delicate Flower Paper Cut
When I first saw the flower paper cut I was bit nervous and a little intimidated because it looked so fragile, delicate, and hard to handle. I knew if I used the proper techniques and applications I should have nothing to worry about, but all the preparation in the world doesn’t matter when you have anxiety in handling fragile and friable artwork. The best approach to take was with an open mind and a patient heart because I knew this would take some time to fit properly. I read all the design notes and looked at all the materials and knew I would need to fit this flower in a very precise way.
The very first thing I did was to remove any debris or unnecessary materials from my work space to ensure nothing compromised the film or the delicate paper cut. This included: sweeping off the work space and using a cleaning solution to make sure the area was clean and safe, especially when handling friable artwork. The framing design included a jet black mat board, Tru Vue White Water glass which is a crystal clear UV glass, and a light, silver metallic frame. Since I was working with such a dark mat and crystal clear glass I knew I had to be careful about lint and debris because the smallest spec would easily show. So I decided to use art handling gloves to handle all of the materials and Mylar since it can be easily smudged or scratched if handled improperly. Although, when I handled the paper cut I was sure to use my actual hands to make sure I handled the artwork properly and to be sure of its tensile strength. When I handled the Mylar, I was very careful in making all my measurements and used a black pen to make all my trimming marks and lines. I also used a new razor so I could be sure to get precise and sharp cuts along those marked lines and points. With this particular encapsulation I decided to use “legs” on the Mylar to help secure the piece in place since there was no actual mounting on the artwork. The “legs” are simply tags that wrap around to the back of the piece, which are then taped in place onto the back of the foamcore. The pressure of the Mylar against the paper cut holds it in place as well as the static charge which is activated once the paper comes into contact with the film. At this point I had to be very careful not to cause any dings or imperfections in the film because they would show pretty loudly in the final product, especially with Tru Vue glass, a black mat, and transparent film.
When the flower was secured and the Mylar was taped in place I put the whole package into the frame right up against the glass. I placed a few framers’ points in place and took a gander at the front of the frame to make sure the overall look and placement of the flower looked stellar and reflected the initial design. Once I was satisfied with everything I fully secured the Mylar with more tape to ensure nothing moved or shifted overtime which could potentially result in a fallen or possibly damaged paper cut. I applied a few more framers’ points along the perimeter and applied a dustcover to the back of the frame. The dustcover is usually made of brown Kraft paper or an acid-free stock which covers the entire back in order to keep dust, pests, moisture, and humidity away from the artwork and the materials. I also applied bump-ons to the bottom two corners of the frame to keep the entire package adequately away from the wall so that air can freely circulate. The bump-ons also prevent the bottom corners of the frame from scratching and scuffing your nicely painted walls. Since the paper cut was very light the entire design was fairly minimal, so I used regular coated wire as the hanging hardware accompanied by a 30lb hook.