Framing a Flag
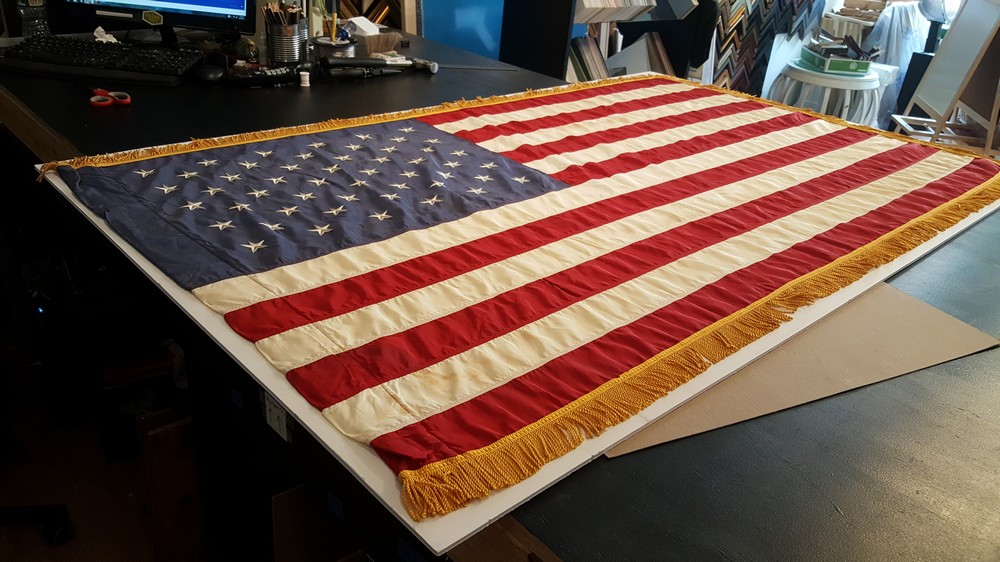
The flag at first glance was very interesting and appeared to be very old and a bit fragile. The colors and the look of the flag were very specific to a Maryland state flag or possibly a Baltimore city flag. The design of the shadow box was very clean and bright, which was ideal for displaying the flag with good complimentary colors and adequate space. Before I even started mounting the flag onto the textured mat, I wanted to be sure all my materials were ready to go and the initial design requirements were being met. If I were to rush into the mounting or rush into gluing materials in place, a simple design oversight could ruin the whole process or compromise the integrity of my work. When sewing a flag or any garment for that matter, you want to be sure that you have the right threads, needles, and tape to properly execute the job. You’ll also need some type of awl or thumbtack to puncture the mat board so the sewing needle can easily pass through the flag and the mat without bending or breaking. Once your materials are set and you’re completely clear about the design and layout, you’re ready to sew.
It always best to plan each stitch carefully because one wrong move could potentially throw the whole process in jeopardy, which means you’ll have to start all over. I also wanted to sew within the seams and the crevices of the flag so my stitch work wouldn’t be so blatantly obvious on first glance. This also helps the illusion that the flag is “floating” in the middle of the shadowbox without any obvious supports. I also wanted to use minimal and strategic stitching, in order to preserve the flag’s initial state and to get the flag as flat as possible. Generally, when sewing down fabric in a custom frame, your ultimate goal is to make the fabric look stellar and presentable, so the viewer’s gaze isn’t obstructed by wrinkles and shadows. There are many ways to stitch down fabric but “couching” is one of the most reliable and widely used methods, which basically consists of sewing simple stiches along the perimeter of the fabric. And sometimes depending on the piece, you may have to stitch in specific areas around the middle of the fabric to prevent wrinkling and inconsistencies. This particular flag was a bit fragile in some places but also strong along the base and the seams which made the stitching fairly easy and straightforward. Sometimes when handling fragile objects it’s advisable to use protective gloves but in this case it was unnecessary. The flag had 4 different colors and was broken up into 6 distinct segments which also included the sturdier fabric at the base and the rope that held it together. Once each segment was sewed down properly, I would tug on the flag in many directions to ensure it was secure and stretched out flat. I would continually check the measurements as I was sewing to make sure it stayed centered and that no part of the flag was being stretched in an opposing direction. Once the flag was sewed down in all appropriate points, I re-measured everything, propped it up against a wall and took a step back to make sure it looked stellar before moving on to the next stage.
Once the flag was properly sewed down, I set it aside until I finished the other components of the shadowbox and to make sure it wouldn’t be inadvertently damaged. Next, I grabbed the frame, glass, mat board, and foamcore for the following stages which consisted of building up the sides of the shadowbox. First thing was to set the glass inside the frame and to make sure the glass stayed clean and uncompromised as possible. I then measured the depth of the rabbet and the length of the lip to make sure I had adequate space for the sides to properly fit. The sides give the shadowbox its depth and perspective and really set the piece apart from common frame designs. Just to be sure, I then referred to the initial design to make sure the depth was correct and the materials were consistent. In order to get straight and true cuts for your shadowbox sides it’s best to use a trimmer or mat board cutter. If the cuts are off or ragged, the inconsistencies will definitely show through in the final product, and will effectively ruin the whole viewing experience. It always best to have more than what you need, just in case you have to recut some if not all of the sides if they don’t properly line up along the perimeter of the rabbet. You must use glue to secure the sides in place, if not; they will eventually peel away from the wood overtime. I used a combination of framer’s glue and a tacky ATG tape to secure all of the shadowbox sides and allowed them to cure for about 30-45 minutes before moving onto the next stage.
When the sides were secured and the glass was cleaned on the inside, I took the mounted flag and carefully placed it onto the sides of the shadowbox. I put a few framers’ points to temporarily hold it in place and took a gander at the front to see how the final product would look. If was I was happy with what I saw, I would remove the points, clean out any debris or lint stuck inside, and securely replace the flag with several framer’s points along the perimeter. If I was unhappy with what I saw I would remove the flag and try to fix any potential issues, such as dirty glazing, excessive debris, or stains on the mat. If there was something drastically wrong with the mounting or the placement of the sides, I would need to start all over considering there is no simple fix for most of these issues.
Once the inside of the shadowbox was cleaned and the flag was secured in place with the proper amount of framer’s points I applied a dustcover and plastic bump-ons to the bottom two corners of the frame. The dustcover is usually made of Kraft paper or an acid-free stock which covers the back of the entire shadowbox in order to keep dust, pests, moisture, and humidity away from the artwork. The bump-ons keep the shadowbox adequately away from the wall so that air can circulate behind the frame and to prevent the bottom corners of the frame from scratching and scuffing your nicely painted walls.
The hanging hardware can vary based on the weight, girth, and bulkiness of the entire frame package. Using wire is not the ideal method when hanging a heavy shadowbox mostly because the wire doesn’t fully support the weight of the whole package putting strain on the frame itself and the wall it’s hanging off. Using D-rings, Wall buddies, or a cleat are the best ways to securely hang the shadowbox on the wall. It’s always ideal to hang the shadowbox on a stud behind the wall, but good wall anchors or drywall supports should do the trick if necessary.