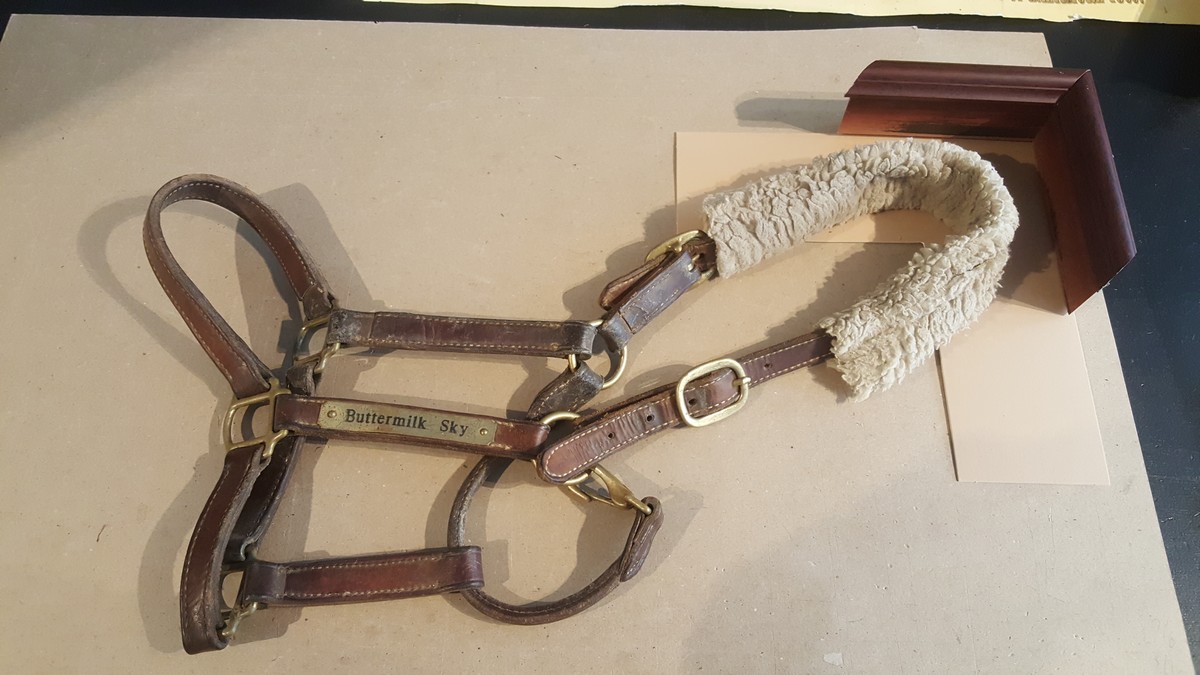
A shadowbox, being a deep seated frame that can hold various objects securely such as: jerseys, rugs, medals, and textured artwork in an interesting and protective manner. The first thing I learned, was that it wasn’t even a saddle, but rather something called a “biddle” which is the harness that goes over the horse’s head and upper neck. It consisted of many leather straps, brass buckles, rings, clasps, and a soft fabric which I assume rested on the back end of the horse’s head. It was also obvious this Biddle had been used for some time; there was much wear and tear and marks all over the leather straps and brass buckles. There was also quite a bit of horse hair, hay, debris, and mud scattered throughout the entire object. Right in the middle of the Biddle was a brass plate with the name, “Buttermilk Sky” etched in black letters in a simple font which turned out to be the racing name of the horse in question.
The biggest challenge for this shadowbox was to find a frame that was deep enough and strong enough to securely hold the straps of the Biddle down as well as the weight of the entire package. There aren’t many frames that are deep enough and strong enough to hold really bulky objects but I was lucky enough to find a few that were be able to do the job. One of the bigger issues was the stiffness of the Biddle which consisted of strong leather straps, big brass buckles and circular and looping elements, considering it’s meant to go over the head of a living animal. So I had to figure out a way to lay out the Biddle in a proper manner not only to keep the correct context of the equipment but also to keep it as flat as possible to properly fit in the frame. I knew I would need about 2 inches of space inside the frame for the Biddle to rest comfortably against the mat without touching other materials of the frame design, especially the glass.
Through many discussions, layouts, and photos we finally came up with a good complimentary design and went with acid-free (even though this isn’t fine art, the customer wanted the best preservation) materials and a very deep frame to properly due the job. I knew this was going to be a big job consisting of a lot of manual labor, planning, cleaning, and trial and error. So I gave myself an additional week to make sure I wasn’t rushing the layout and mounting. If I were to rush the mounting, the Biddle would not be properly set resulting in mounts coming loose and elements of the Biddle and frame design becoming potentially damaged. I made a detailed drawing of the Biddle with all its relative mounting points to make sure it had adequate securement and the layout was consistent with what I discussed with the customer. It was also much easier to repeatedly look at a drawing rather than a photo on my phone which repeatedly tends to turn itself off. For this job I knew I would need stronger mounting materials to handle the weight and girth of the Biddle, to make sure it stayed in the same position for decades to come. Using fluted hardboard called “Coroplast” and a 12lb monofilament cord for mounting, these materials would help hold down the Biddle in the right places for a long time.
Before I started mounting I cleaned up my space, retrieved my design notes, and laid out all my materials in a clear and accessible way. I then took the Biddle and roughly laid it out according to the notes, photos, and drawings to try and mimic the positioning as best as I could. I also wanted to test the strength and tension of the various straps and buckles to see if they would hold their position once mounted. Some of the elements were hard to manipulate considering there were loops, bulky brass buckles, and very stiff leather straps. Through some play and small tweaks of the various parts I was able to get the Biddle resting fairly flat under the 2 inch depth mark. When I actually started mounting the Biddle I started from the middle out and constantly measured my margins and depth. I was very strategic in placing my mounting points behind certain straps and buckles, to ensure they were as innocuous and invisible as possible. Because of the thickness of the materials, I had to use a metal thumbtack and hammer to puncture my mounting holes and a pair of needle nose pliers to guide the needle through the various layers. I tied off the monofilament cord 3 times to make sure it was knotted securely then taped the knot to the Coroplast to make sure it couldn’t easily unravel. Once I mounted all the necessary points, I set the mounted Biddle upright to see how it would hold up against gravity. The Biddle held up very well with little to no shifting in the front and back mounting points. There were only a couple areas that need some additional mounting work.
The next step was building up the sides for the shadowbox which in this particular case needed to be very deep; pretty much the maximum allowance allowed. I set the Biddle aside to make sure it wouldn’t be inadvertently damaged while I was cutting components for the side panels. First thing I did, was very carefully set the museum glass inside the frame and made sure the glass stayed clean and uncompromised as possible. I used ATG tape and framer’s glue to set the sides against the side panels of the rabbet which extended 2 inches deep. I was unsure about whether to use a hardboard or Gatorboard for the back end of the panels but ended using a black foam core which worked out just fine. When the sides were secured and the glass was cleaned on the inside, I took the mounted Biddle and carefully placed it onto the sides of the shadowbox. I put a few framers’ points to temporarily hold it in place and took a gander at the front to see how the final product would look. If was I was happy with what I saw, I would remove the points, clean out any debris or lint stuck inside, and securely replace the biddle with several framer’s points along the perimeter.
Once the inside of the shadowbox was cleaned and the biddle was secured in place with the proper amount of framer’s points I applied a dustcover and plastic bump-ons to the bottom two corners of the frame.The dustcover is usually made of Kraft paper or an acid-free stock which covers the back of the entire shadowbox in order to keep dust, pests, moisture, and humidity away from the artwork. The bump-ons keep the shadowbox adequately away from the wall so that air can circulate behind the frame and to prevent the bottom corners of the frame from scratching and scuffing your nicely painted walls. In the end, the entire shadowbox wasn’t very heavy and didn’t require any special hanging hardware other than properly gauged wire and a good set of 50lbs. hooks.
When the customer came to pick up the shadowbox, I asked him a few questions about the horse, “Buttermilk Sky” and what ultimately happened to him in the horse-racing world. He briefly told me that Buttermilk Sky wasn’t the best race horse around and had some potential in other areas of equestrian sports. After a couple moves around New England and some rigorous training, the horse became a pretty good jumper and seemed ready to compete on a bigger stage, possibly even the Olympics in the near future. Unfortunately, after some good years of competitive work and skills, the horse succumbed to an ailment affecting the internal organs and died of complications shortly after. The customer’s wife was deeply saddened by the death of the horse and he wanted to find a way to help his wife remember the horse’s prime years and great skills. We both believed that this shadowbox would be a great way to preserve the memory of the ambitious competitive horse and by the customer’s initial reaction it seems like I did a great job! We did also talk about potentially adding a brass plate inside the shadowbox with a short list of Buttermilk Sky’s greatest wins and competitions but only if it felt necessary to give more context to the Biddle and to the horse’s illustrious career.