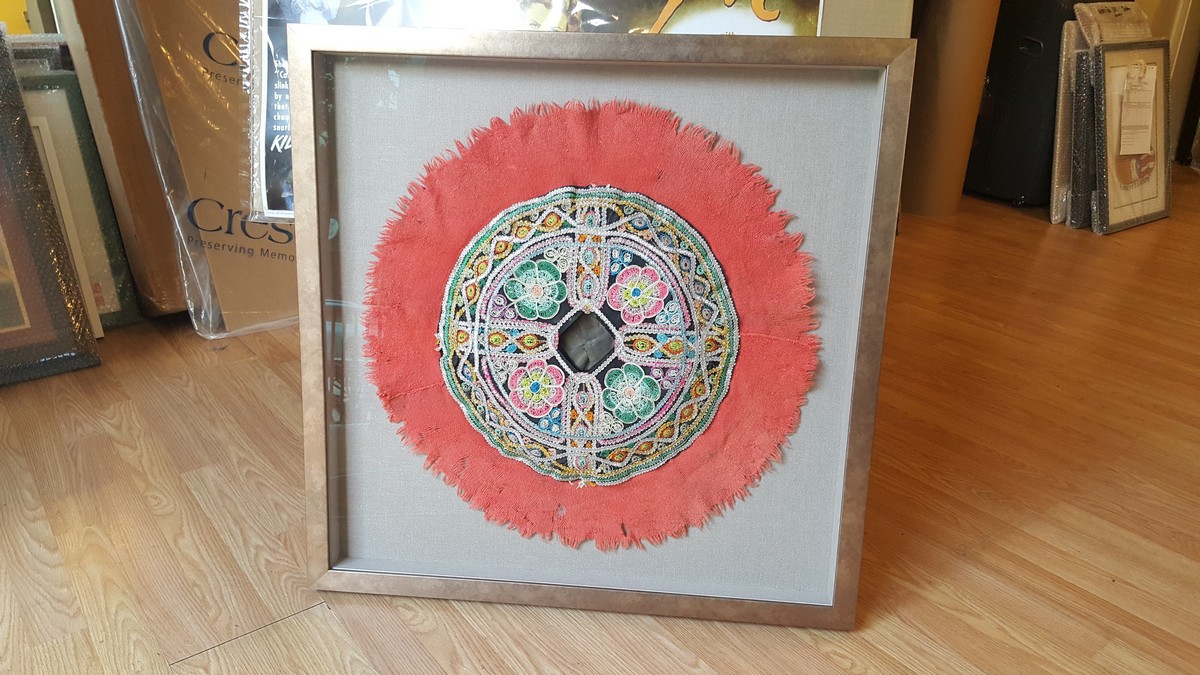
The hat was about an inch deep which would require a fairly deep molding to hold the hat firmly in place and to hold the weight of the other materials. There aren’t many options when it comes to deep frames in terms of design and colors but we had a good amount of simple deep frames that she could choose from. We decided to focus on the frame first and decide on the mat second. She chose a deep simple, squarish frame with dark brass/dirty gold tones with a dull patina like application. The slight shimmer of the metallic patina helped reflect the bright sequence patterned of the black cap of the hat. It didn’t clash with the reddish brim so it seemed like a safe bet. With a hat that has many textures and components it seemed appropriate to compliment the hat with a fabric covered mat instead of paper. There are many paper mats with the proper color and texture that would’ve worked just fine but a fabric mat really seemed to bring the whole design together. We looked at many different colors and different types of fabrics from cotton to suede but finally decided on linen which had the feel of finely knitted burlap or woven hemp. The frame and the mat complimented each other very well and the colors were subtle enough for the hat to contrast well enough that it seemed to “pop” and jump out at you as you observed it. It definitely has a classic museum look to it which the customer appreciated and reflected that this would probably be in her family for decades to come. I advised her to use acrylic instead of glass because of the extra weight and to prevent potential glass breakage which would potentially harm the very fragile hat. I knew I would have to mount the hat in several places to ensure its securement and to relieve any stress on the materials or the overall structure. This would require a lot of patience, planning, different colored threads, and a bit of research. I did a Google search for Peruvian hats just to see what type of materials they traditionally use and how they are made. The info didn’t really change my methodology but it was good to know before I started the whole process. I also gave myself an extra week to work on the project so I wouldn’t be rushed in the mounting process.
Once I had all of my tools on hand, I planned out my execution and checked on the initial design to make sure I was exacting in my measurements and materials. I was very didactic in my stitch placement so I wouldn’t put too much strain on the hat in any given direction. After I finished all my initial stiches I went back to fill in the gaps as needed, especially at the top of the hat which would be holding the brunt of the weight over time. When I felt confident the hat was securely affixed I held it upright to make sure it looked good in all orientations considering it was perfect circle in a perfect square, also referred to as a spandrel. If I was dissatisfied with what I saw I would need to go back and make the proper adjustments to make it as flat and appealing as possible. I did notice when I held the hat upright that a few places along the feathered brim wasn’t lying flat or looked a bit lumpy. With some strategic pressing and smoothing I was able to get most of the lumps out with a few stiches in a couple specific areas along the perimeter. I was cautious because I didn’t want to overdo it, because over time the fibers and threads of the hat would eventually expand and contract because of the seasons and relative humidity. In fact, I didn’t stitch along the bottom section and allowed gravity to pull it naturally towards the ground. If I were to constrict the hat too much it would put strain on the fragile materials resulting in possible damage or even splitting.
Once the hat was properly sewed down, I set it aside until I finished the other components of the shadowbox and to make sure it wouldn’t be inadvertently damaged. Next, I grabbed the frame, acrylic, mat board, and foamcore for the following stages which consisted of building up the sides of the shadowbox. First thing was to set the acrylic inside the frame and to make sure it stayed clean and uncompromised as possible. I then measured the depth of the rabbet and the length of the lip to make sure I had adequate space for the sides to properly fit. The sides give the shadowbox its depth and perspective and really set the piece apart from common frame designs. Just to be sure, I then referred to the initial design to make sure the depth was correct and the materials were consistent. In order to get straight and true cuts for your shadowbox sides it’s best to use a trimmer or mat board cutter. If the cuts are off or ragged, the inconsistencies will definitely show through in the final product, and will effectively ruin the whole viewing experience. It always best to have more than what you need, just in case you have to recut some if not all of the sides if they don’t properly line up along the perimeter of the rabbet. You must use glue to secure the sides in place, if not; they will eventually peel away from the wood overtime. I used a combination of framer’s glue and a tacky ATG tape to secure all of the shadowbox sides and allowed them to cure for about 30-45 minutes before moving onto the next stage.
When the sides were secured and the acrylic was cleaned on the inside, I took the mounted hat and carefully placed it onto the sides of the shadowbox. I put a few framers’ points to temporarily hold it in place and took a gander at the front to see how the final product would look. If was I was happy with what I saw, I would remove the points, clean out any debris or lint stuck inside, and securely replace the hat with several framer’s points along the perimeter. If I was unhappy with what I saw I would remove the hat and try to fix any potential issues, such as dirty glazing, excessive debris, or stains on the mat. If there was something drastically wrong with the mounting or the placement of the sides, I would need to start all over considering there is no simple fix for most of these issues.
Once the inside of the shadowbox was cleaned and the hat was secured in place with the proper amount of framer’s points I applied a dustcover and plastic bump-ons to the bottom two corners of the frame. The dustcover is usually made of Kraft paper or an acid-free stock which covers the back of the entire shadowbox in order to keep dust, pests, moisture, and humidity away from the artwork. The bump-ons keep the shadowbox adequately away from the wall so that air can circulate behind the frame and to prevent the bottom corners of the frame from scratching and scuffing your nicely painted walls.
You must be logged in to post a comment.
click here to log in