The first thing to consider when hanging artwork in your house is identifying where the optimal viewing height will be. The second more important consideration is: does that space receive good light?
Any artwork needs a good line of sight to be enjoyed and to make sure people of many heights and sizes can comfortable view the artwork.
You’ll also want to consider the lighting, whether it be natural or artificial light, and how much is needed to properly illuminate the artwork. If the lighting is coming from natural sunlight, keep in mind that the artwork will only be lit for half of the day and will susceptible to UV damage during that time.
Reduce UV Radiation Exposure to Hung Artwork
There are many ways one can alleviate large amounts of UV radiation hitting the artwork, but a daily dose of sunlight to any artwork will fade the colors and deteriorate the materials over time. Using UV-protected glazing and anti-UV varnishes on the actual artwork are the best defenses from large amounts of UV radiation.
Natural sunlight delivers the highest amount of UV in most homes. But, UV radiation can also be found (on various levels) in other forms of indoor lighting such as: Tungsten, Halogen, Fluorescent, and LEDS . If one takes the right steps, you can ensure that the artwork can retain its resilience for decades or even centuries to come. If not, an image can largely fade within a couple year because of sunlight, artificial light, or poor storage.
Next Steps: Hanging Your Artwork
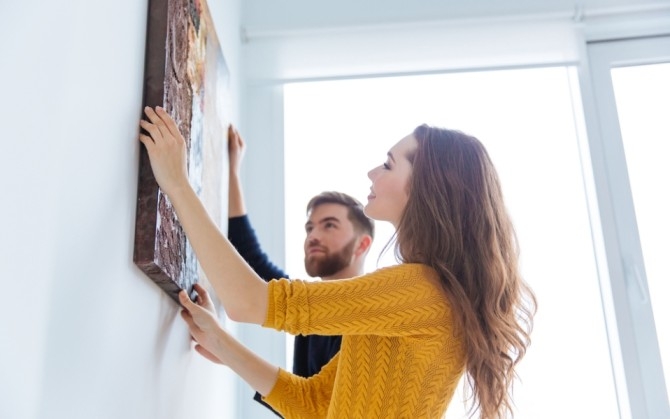
Once you’ve picked out a couple optimal spaces and lighting scenarios then you’re ready to hang. Ideally when you hang an artwork you’ll want a second opinion for height and placement. This means, you’ll want someone to view the artwork in the space before you start installing hanging hardware.
The best way to do this is to have someone view the artwork in the space from a distance as you or someone else physically holds the artwork in place against the wall. This is also very good for achieving the optimal height. Once the ideal placement is reached you’ll want to mark somewhere on the wall (always with a pencil, so you can erase the mark later) to remember where that height was optimally viewed.
If the artwork is framed or has some type of wire on the back, you’ll need to know how heavy the artwork is before hanging it on your wall. If you have a heavy piece of artwork you’ll need sturdier hooks to hold the weight of the artwork and ideally a stud in your wall to anchor the hook.
In some cases, you can use a wall anchor if you don’t have a stud in the right place but it depends on the weight and size of the artwork. If your piece is long or oddly shaped, you’ll need more than one hook or several to balance the weight. Getting the hooks level can be challenging but necessary if you want the artwork to look good from a distance.
Essential Tools for Hanging Artwork:
- Tape Measure
- Pencil with an Eraser
- Hammer
- Bubble level (or) Laser level
- Hooks and Nails
- Wall Anchors (if necessary)
- Painters' Tape (if necessary)
Need Framed Artwork or Photos to Hang?
The Frame Room understands not only knows how to create customized and flattering frames, we're also experts in interior design and providing advice on how to hang and style wall art.
Contact us today or place an order online to get started!
You must be logged in to post a comment.
click here to log in